Showing posts with label tutorial. Show all posts

Sunday, March 13, 2011

How to fold seed starter pots.

Really useful bit of origami this.

Take a piece of paper - I know that lost places tell you to use newspaper but I need all of mine for starting fires with (no not an arsonist just have wood fired stoves for heating), so I use old magazines or publicity material and find it works just as well.  In fact at double thickness the magazines are quite strong and last a bit longer for planting things like brassicas that need to be a reasonable size before planting out.

Lay a page flat in front of you
Fold in half left to right - so it looks like a magazine again - just ignore the dodgy fashion advice


Fold in half again, this time bottom up to the top edge

Fold in half, left to right so that it resembles the folded paper as above, and do not turn
Then take the bottom right corner and open out forming an upside down triangle with the point in the folds at the centre of the folded paper


Turn over and fold again, starting from the bottom right to create another triangle.  From this side you can see the folds and the edges of the paper

Imagine you are turning a page and one edge of the triangle over to reveal the other side which has no edges showing, do the same on the other side, leaving the paper as above
Fold the outer edge towards the centre crease

Fold again towards the centre crease
Turn and repeat until your paper looks as above

Then turn the top flap over and press hard along the creases

Turn over and repeat the same folds into the centre crease

Pull gently on the flaps to open up the top of the pot, then press out the bottom into a square shape with your fingers
And there you have some free seedling starter pots ready for compost and Spring!


Friday, January 21, 2011

How to treble crochet - January's Creative C continued

The main stitch I used to make this bag was a treble crochet - a new stitch for me but as the fabric was quite thick cotton (from some recycled jogging pants) I wanted a large stitch to go with my large crochet hook.

So here is my how to treble crochet

This is the finished treble crochet.

You can see it creates a large-ish gap then has a smalker gap at the top, bisected by a strand of yarn, when working the next row you work into the smaller gap not the larger.

Start by winding the yarn over the hook twice to give you three loops on the hook


push yarn through the next stitch - you will momentarily have four loops over the hook

pull yarn through the first two loops on the crochet hook - three loops left on the hook and the first part of the stitch completed below the hook

pull yarn through the next two loops on the hook, leaving one worked stitch on the hook and the previous stitch's loop on the hook (two stitches in total left on hook)


pull yarn through the two remaining loops on the hook to join the new stitch to the old stitch and viola - one treble crochet


Thursday, September 30, 2010

Top up Thursday

For alliteration purposes I am sure that this should have been Tuesday, but never mind.

You know those days when you put your hand on something and it is empty, like the salt cellar or the milk jug, well I am having one of those days, so far the counter top wash bottle has been empty, the coffee pot, my bottle of facial cleanser, the milk carton and the bleach spray for the bathroom - sensing the theme here - so I am having a top up day.

With everything now brimming over with its intended contents I can get on with more fun things, like finishing my rosehip tea.

Having dried out the rose hips overnight on a tray in the warming oven, I gave them a rough chopping with one of those double handled herb chopping knives - I have only used this a couple of times so I do have to justify its position on the knife rack!

Then seive them through a fine mesh seive, like sifting flour, you will be surprised at the amount of fibres that come off the rosehips - these can be irritating so best to deal with them now.


I found another of my bargain finds lying around in the barn, a stoppered glass jar with a rubber seal, and I have to say the rosehips are a pretty addition to my sideboard too.

They smell utterly divine - shame I can't photograph that for you.

Thursday, September 16, 2010

Green Tomato Chutney - two versions.


Lovely green tomatoes - crying out for chutney, who am I to refuse.


Take some fresh onions straight from the ground, red and white.


Pick some lovely bright green and beautiful tomatoes, and you are ready to go.


I am having a go at two different recipes this time, one a sweeter chutney and one an Indian inspired one, and in the spirit of being organised, instead of trying to read two recipes at the same time and scrambling about for ingredients whilst things stick to the bottom of the pan, I am preparing everything in advance then setting to the cooking.

Professional eh?


Recipe 1 - Green tomato and Red Onion Relish


900g tomatoes
350g red onion
90g raisins
250g light muscovado sugar or cane sugar
1 hot red chili
1 teaspoon salt
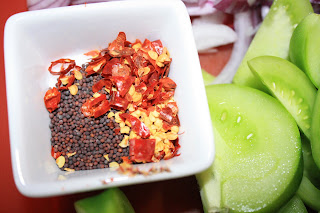
2 tablespoons brown mustard seeds
300ml cider vinegar

Combine the spices together, pour everything into a pan, pour over the vinegar, stir to ensure all the sugar dissolves then leave to simmer for about an hour.


Recipe 2 - Indian Green Tomato Chutney


4 cups of chopped green tomatoes
1 green pepper
2 apples, peeled, cored and cubed
1 hot pepper chopped finely
1 white onion
3 cloves garlic
2 tablespoons minced ginger root
zest and juice of one lemon
1/2 cup white wine vinegar
1/2 cup sugar
1/2 teaspoon salt
1/2 teaspoon coriander seeds
2 teaspoons mustard seeds
1/4 teaspoon cinnamon
1/4 teaspoon allspice
1/4 teaspoon tumeric


These are my coriander seeds harvested and dried next to the Rayburn - ready for just such a recipe.


Combine the spices together.
Throw everything in a pan, stir to dissolve the sugar and simmer for an hour.

As I sit here writing this at the kitchen table the room is filled with the wonderful aroma of chutney cooking.

Making my stomach grumble.

Have to wait 3 months for the chutnety to mature, it will be ready just in time for Christmas.

Spoon the mixture out into sterilised jars (wash jars well then put in a warm oven for 10 minutes, boil the lids for a couple of minutes), wear heat proof gloves to handle the jars and seal the lids on tightly.  Stand upside down on the lid for a few minutes to create a good seal, turn back over and wait for the lids to pop down before storing in a cool dark place for the next 3 months.

Tuesday, July 20, 2010

Wardrobe refashion frenzy - converting skirts to tops Part 2


Stained Skirt to Vest Top 


I managed to get a big red stain on this skirt - no idea how, it may have been red wine or it could just as easily have been cherry juices from my jam making or even beetroot juice, anyway the end result was one ruined skirt - and a hand made skirt in some lovely old retro fabric at that.  Well there was no way I was going to take that lying down, so out came the scissors and another refashion was born.

First I removed the waistband and put it to one side.  As this skirt is made from scraps and I don't have any more of the material around, every square inch is required.

For the armholes I copied the curve from another pattern onto some publicity paper.


I then pinned the skirt together from the removed waistband along the side seams to the approximate depth of the armholes, drew the curve onto the material and cut through the double thickness of the material.


Once the armholes had been cut out, I unpinned the material, opened it out and pinned a small hem to finish, this was then whizzed into place with straight stitches on the sewing machine.

As the neck line front and back was now a raw edge, and with no material to spare I used a couple of rectangles of contrasting cotton to create a neck piece into which I could tuck the raw edges and give a nice finish to make the top look like a top rather than a skirt with two holes cut in it.

To start, I pinned the contrast material to the necklines, right sides to right sides.  The skirt material has some horizontal pattern lines so I just used one of those as the base line to follow.

Once pinned in place I basted the raw edges together.


Then with the use of the hot iron, I folded in the raw edges at the sides then tucked under to create a hem across the front and back to create a block of contrast material that I could then topstitch in place, but not until I had the straps in place.

To create the straps, I unpicked the old waistband, then refolded the raw edges in, fixed in place with the hot iron, and ran a line of topstitching down the length.


I then pushed the end of the straps into the sides of the contrast material at the back, then put on the top to find the right length for the straps.

I marked the correct length with a pin, and evened them up once I had removed the top, so that both straps were an identical length.

Here's the clever bit - remember that pin, don't remove it, just reposition it so that both straps are at the correct equal length, snip the remainder of the strap away leaving a tail just a couple of centimetre long, then feed the tail into the contrast border until you hit the pin, then secure the tail inside the border with a pin until time to stitch.  Neat and easy, much easier than trying to measure the straps once they are looped from front to back.

With the straps in place, I topstitched all the way around the contrast material in straight stitch, reversing over the places where the straps feed into the front and back corners.

Now with the main body of the top finished I just had to do something about the stain on the front.  Using the bits of armhole I had cut out, I fashioned a pocket, with a top band from the same contrast material.  I stitched the band, right sides together at the top of the pocket, then folded a hem in much the same way as for the necklines.

I just zig-zag stitched around the raw edge of the pocket, then pinned it in position, and folded the raw edge in, then top stitched the pocket into place.

Not a very good photo I know, but it is the finished article, ready to wear.